Saturday, January 24, 2015

Printing DIYFish Planner Inserts

So...let's say you have decided to get DIYFish inserts.

And let's say you finally decided which set would work for your needs and the size/style of your planner...

But then let's say you get the files downloaded to your computer and you're wondering how the heck to get them from your computer to your planner...LOL


A lot of people have difficulty printing these inserts out simply because they don't look like "normal" calendar pages. There are a lot of different files, parts & pieces to this system--but in the end, it is simply BEAUTIFUL and totally worth the effort.

I created a step-by-step video on how to print the daily pages, which is the bulk of the month. If you can print the dailies, you can print anything!

Keep in mind that your printer may have different settings, so experiment a little. Don't be afraid to try things out! You can do it!

One more tip: In working with several different printers and copy machines over the course of the years, one tip that helps me is to first figure out how your printer loads pages and runs them through. Take a marker and write TOP on one side of the page and then load it face up in your paper tray. If you have a top loading tray like me, draw an arrow, too, so you can see which way it loads in the tray.


Watch the video for step-by-step instructions. Soon I hope to do a video on how to cut and put it all together. I'm a visual learner, so I hope this helps others like me!


Get these inserts here.

See how DIYFish explains the printing process on her blog!


Saturday, December 27, 2014

Frixion Pens: A Review

I've been using Pilot Frixion Pens in my planner for the last 6 months and I love them! But others hate them...which makes it confusing if you are trying to decide to buy some because who do you believe?

I decided to do a video review so you could see them in action and make an informed decision! In the video I cover things like:

  • Color choices
  • Erasing & then rewriting--what's the secret to smooth/clear writing?
  • Erasing when the ink is still wet vs. dry
  • Can you laminate a page with Frixion ink on it?
  • What does Frixion and Freezers have to do with each other??
  • What should you use these pens on...and what should you NOT?

Check out my review and if you use Frixion pens, let me know what your experience has been!

**I have purchased these pens on my own and these opinions are my own...Your mileage may vary!**


Friday, August 29, 2014

Planner Bookmarks - FREE Printable!

You may remember when I updated my planner inserts, I also created a new bookmark to not only hold my place but also to list my dailies & weeklies--I strongly dislike repetitive list-making, so this seemed like a great solution!


Well, I was asked to make an editable PDF so others could print & use my bookmark and make it suit their needs. This is the first time I've done a PDF that you can fill out, so hopefully this works! (Let me know in the comments if you have problems and I'll see if I can figure it out.)


I've made two versions, because mine has a Bible scripture on it and I thought some people might prefer something else, so I found a great quote from Ralph Waldo Emerson. If you want to put something else up there or leave it blank, I suppose you could put your preference on a sticky label and cover it up before you laminate! But all you have to do is download the file, type in your lists, print, cut along the dotted lines and then place them back to back and laminate. Laminating them will give them durability, so trust me...you'll want to laminate!

When you laminate, use an 8 1/2 x 11 laminating pouch and then trim it down. I suggest you leave a wide border on the side you need to punch (I used an ARC punch, but you can use whatever works for your planner!). Then pop it in your planner! If you have a traditional ring planner, snip the punched holes so they have slits on the side (similar to what I did with these closet organizers) so you can move it from day to day without opening your rings!

Let me know what you think (or if you have issues) in the comments!


Sunday, August 24, 2014

DIY Teacup Candles

Yesterday some friends & I got together to do some crafting. It all started when I got a cute candle as a gift from Danielle...then Amy saw it and wanted to learn how to make it. So I said if you all bring the stuff and the expertise, we can use my kitchen! And since I've made an effort to be more organized, spontaneous craft days can happen without a fuss!

We got together and I decided this was a great time to do a video! They were reluctant at first, but then they were good sports about it. And Danielle is an excellent teacher!

Before we get to the video, let me give you the list of things you'll need:

  • Paraffin wax from the craft store
  • Scented wax melts (also from the craft store)
  • Candle wicks (or old unused candles so you can reuse the wicks)
  • Tea cups or other heat-proof containers
  • A couple of pots
  • Stirring utensils
  • Patience
  • A blow dryer
  • Glitter (optional)
Take a look at the video for how we did it, or read on for the instructions (and some dos & don'ts)!


First, if you don't have wicks from the craft store, just pull them out of your old unused candles. If they don't want to come out easily from the bottom, carefully use a knife to cut the candle open. We theorized that you might also be able to freeze the candles and then smash them...but hey...why not do it the hard way? LOL

Once you have your wicks, place one in the bottom of a clean cup and make sure it's the right length. If it's too long, trim it. If it's too short, just make sure not to put too much wax in the cup. You'll want about 1/4 of an inch of wick peeking out from the wax. Too much and it will smoke when you light it and too little and it won't light at all!

Then, break open the wax and break it into smaller chunks. Place the chunks in a saucepan and heat it over VERY LOW heat so it can melt slowly. Don't let it start to simmer or bubble in any way. Stir gently to help it along. Once the wax is melted (or mostly melted), put some of the scent blocks in the wax. Allow it to melt and mix together with the wax. This adds scent and color. You can add some glitter if you like, but we found that it ends up settling to the bottom.

Once it's completely melted you're ready to pour it into the cup! If you have a measuring cup with a spout, this may work better...when we poured it directly from the pan, we had a lot of drips all over the stove and counter top! But heat the measuring cup first--the wax will start to harden as soon as it touches a cold surface. I recommend putting warm water in the measuring cup and let it sit while you melt the wax. When the wax is melted, pour out the water and dry the cup. Pour the wax into the measuring cup and use that to then pour it into the teacup. The spout will give you better accuracy and less mess when you pour. However, it's not a problem if you don't have one...that's what the blow dryer will be for later! ;)

Gently pour the hot wax into the tea cup. We experimented with putting the wick in first (the wax moves the wick all over the place) or putting it in after the wax (just be careful not to overfill the cup, which will cause the wick to sink and become useless). If the wick falls over, use tongs to stabilize it. You can place a wooden spoon or pencil across the top of the cup so the wick can lean on it...but we didn't think of that at the time and we just kept getting mad at the wicks for laying down on the job! LOL

Once you have the right amount of wax in the cup and your wick is in place, you can sprinkle some more glitter on top if you want more sparkle! (Because why not??)

Let the cups cool for about an hour or so...the wax doesn't take too long to set, but you want it to be nice and hard before you move it. Don't set it in a drafty place--it might cool faster, but it could cause wells or pits to appear in the hardened wax. If this happens, you can just melt more wax to fill in the spot or leave it--as the candle burns, it will level out eventually.

If wax splashes up onto the side of the cup and you want to clean it up, use the blow dryer on the low setting to reheat the wax and wipe it away with a paper towel. This is also the best way to clean spilled wax from the stove or counter--blow dry and wipe!


These make super cute (and super smelling) gifts!


Monday, August 18, 2014

Back to School + My First FREE Printable!

It's the time of year again...and it's another blog post on the subject...LOL

I know, I know...everyone and their mamas (literally) are blogging about "Back to School" but this year is a little different for us and I got all excited about it more than usual, which means of course I have to share!

Since we moved, we live in different school "assigned area". We are in the same district, but the kids are assigned to different schools than they were in our former neighborhood. So, we decided to let the kids choose whether they wanted to stick with homeschooling (or "public school at home": we have used Connections Academy in recent years) or if they want to go back to a traditional public school. Two out of the three chose to attend school away from home. My middle child wanted to continue with Connections Academy, so we will do that again this year with him.

Attending school outside of home for the first time in 7 years made all of us a little excited...and I went a little crazy with school supplies, clothes, schedules and things like that. I love new routines! (Hello...I'm a planner addict so this couldn't have come as a surprise to you...LOL)

I wanted to share a couple of things I have done in the hopes that it might help you out, too!

1. Box Tops


I have never been great at collecting this little boogers, but I figured I might as well start now...right? To be honest, I've really cut down on the amount of processed foods we buy, so this might not even be a big deal if we're not bringing in the right products anyway. But I might as well as a place for them, right? I keep this cute jar on my computer desk, which is in the corner of the kitchen...near the scissors...no excuse now! Right??

2. Menu Board

The question is the same...every...day...

"What's for dinner??"


I've been trying to get in the habit of writing down a semi-formulated plan in my planner each week, but the truth is, no one else looks at my planner except me. So no one knows that I have a plan...except me! So, I found this totally adorable FREE printable here at I Heart Planners and then simply laminated it and used double stick tape to affix magnets on the back. A little dry erase marker at the beginning of the week and a wet paper towel at the end of the week and VOILA! BONUS: It's the only thing on my fridge so it's hard to miss.

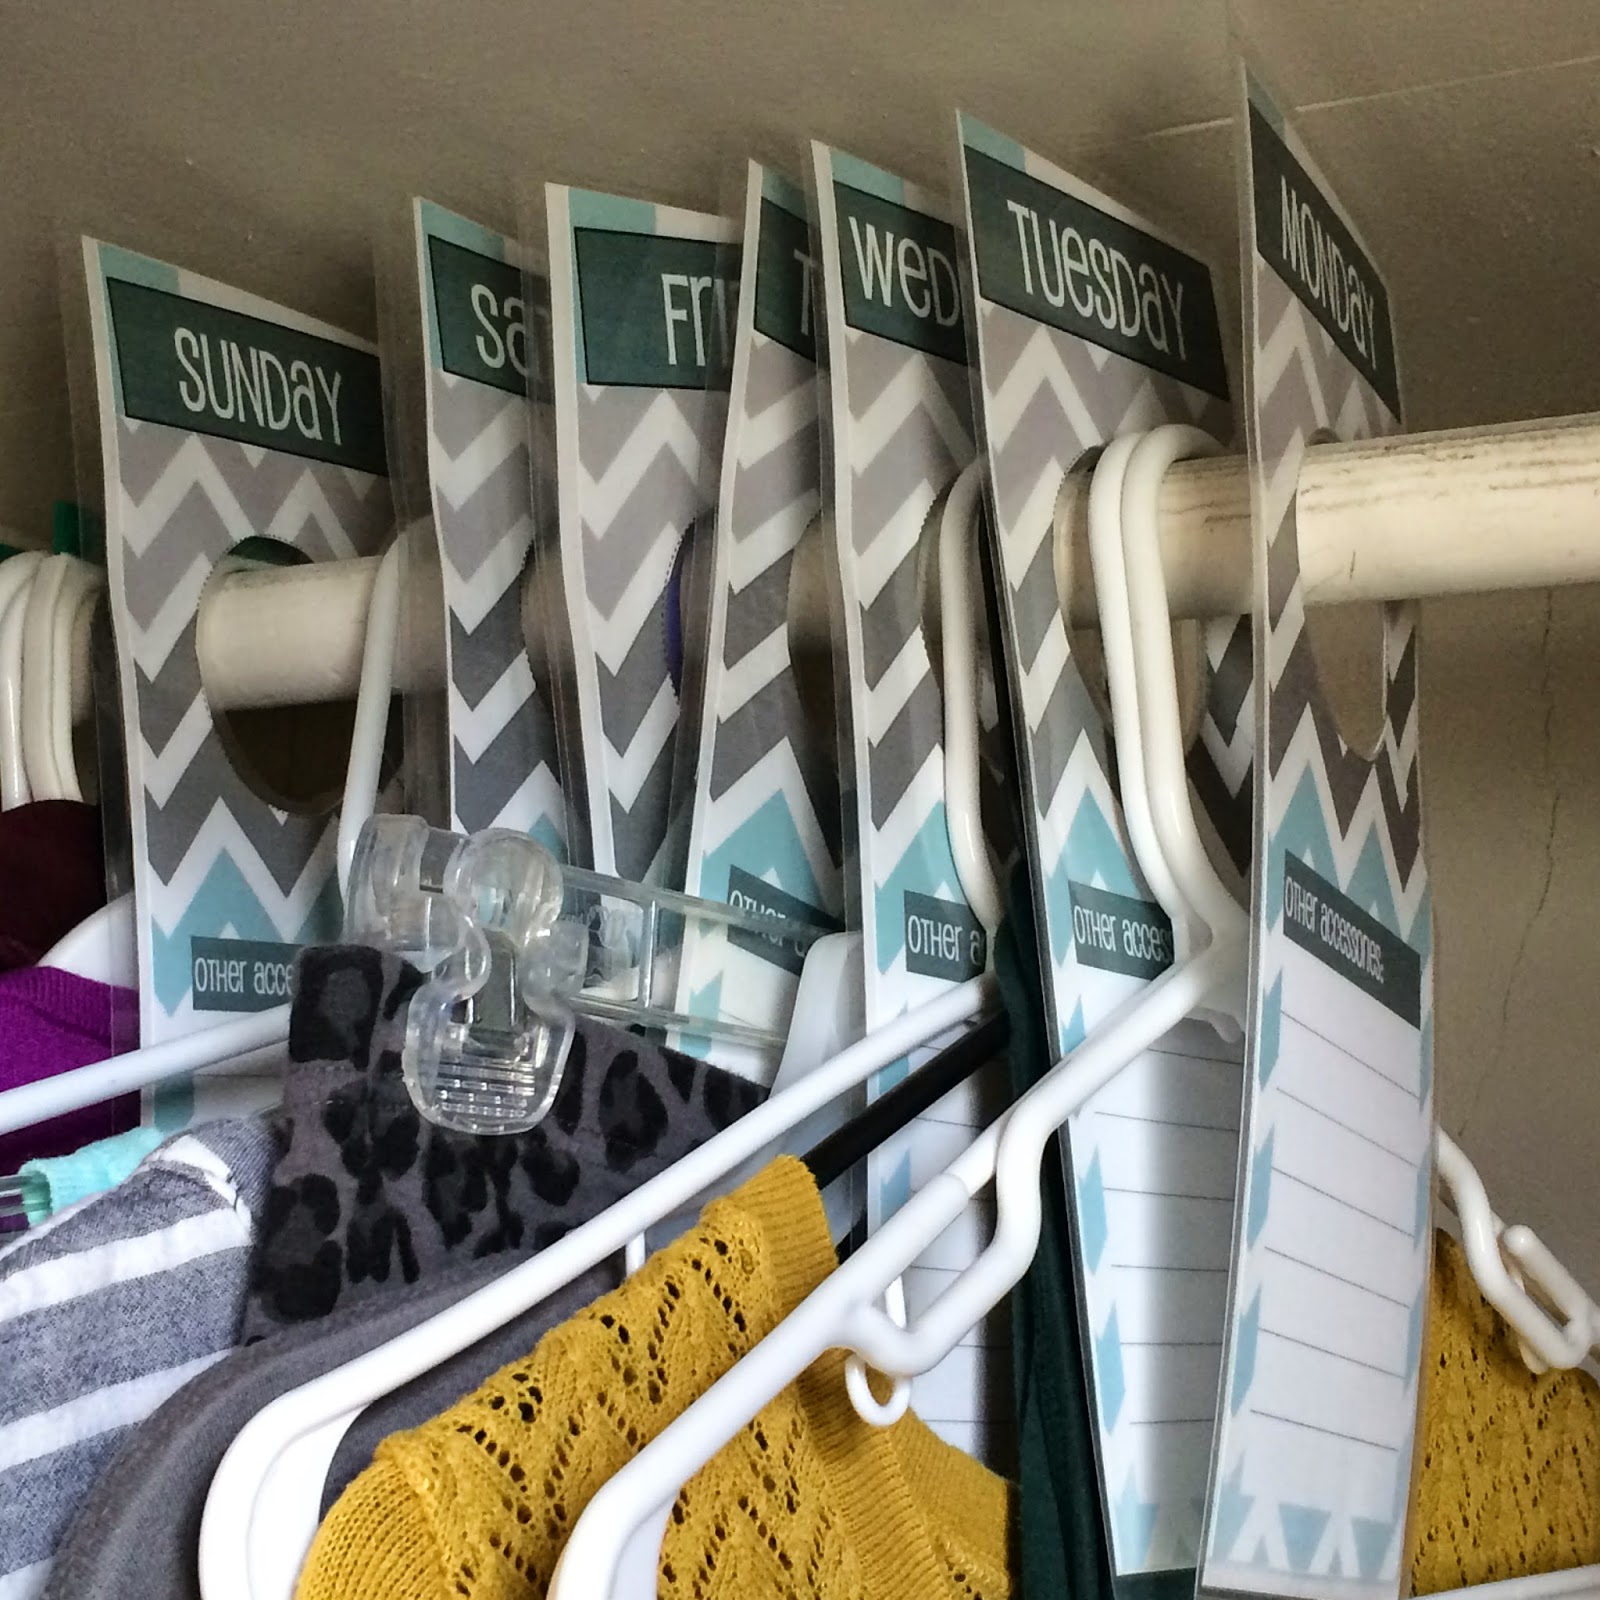
3. Day-of-the-Week Closet Organizer 


I have one son who will be homeschooling and one son in a charter school that requires mandatory uniforms. But my daughter...my sweet 5th grade daughter...she gets to go to a public school that does NOT have a uniform policy and she is beyond thrilled. So, to help her get organized, I decided to create these Day of the Week Closet Organizers! I've seen these all over Pinterest (and I'm sure you have, too), but I wanted to create my own. Then I laminated them so that she can use a dry-erase marker to write down any other accessories she plans to wear that may not be able to hang in her closet (shoes, jewelry, scarves, etc.).


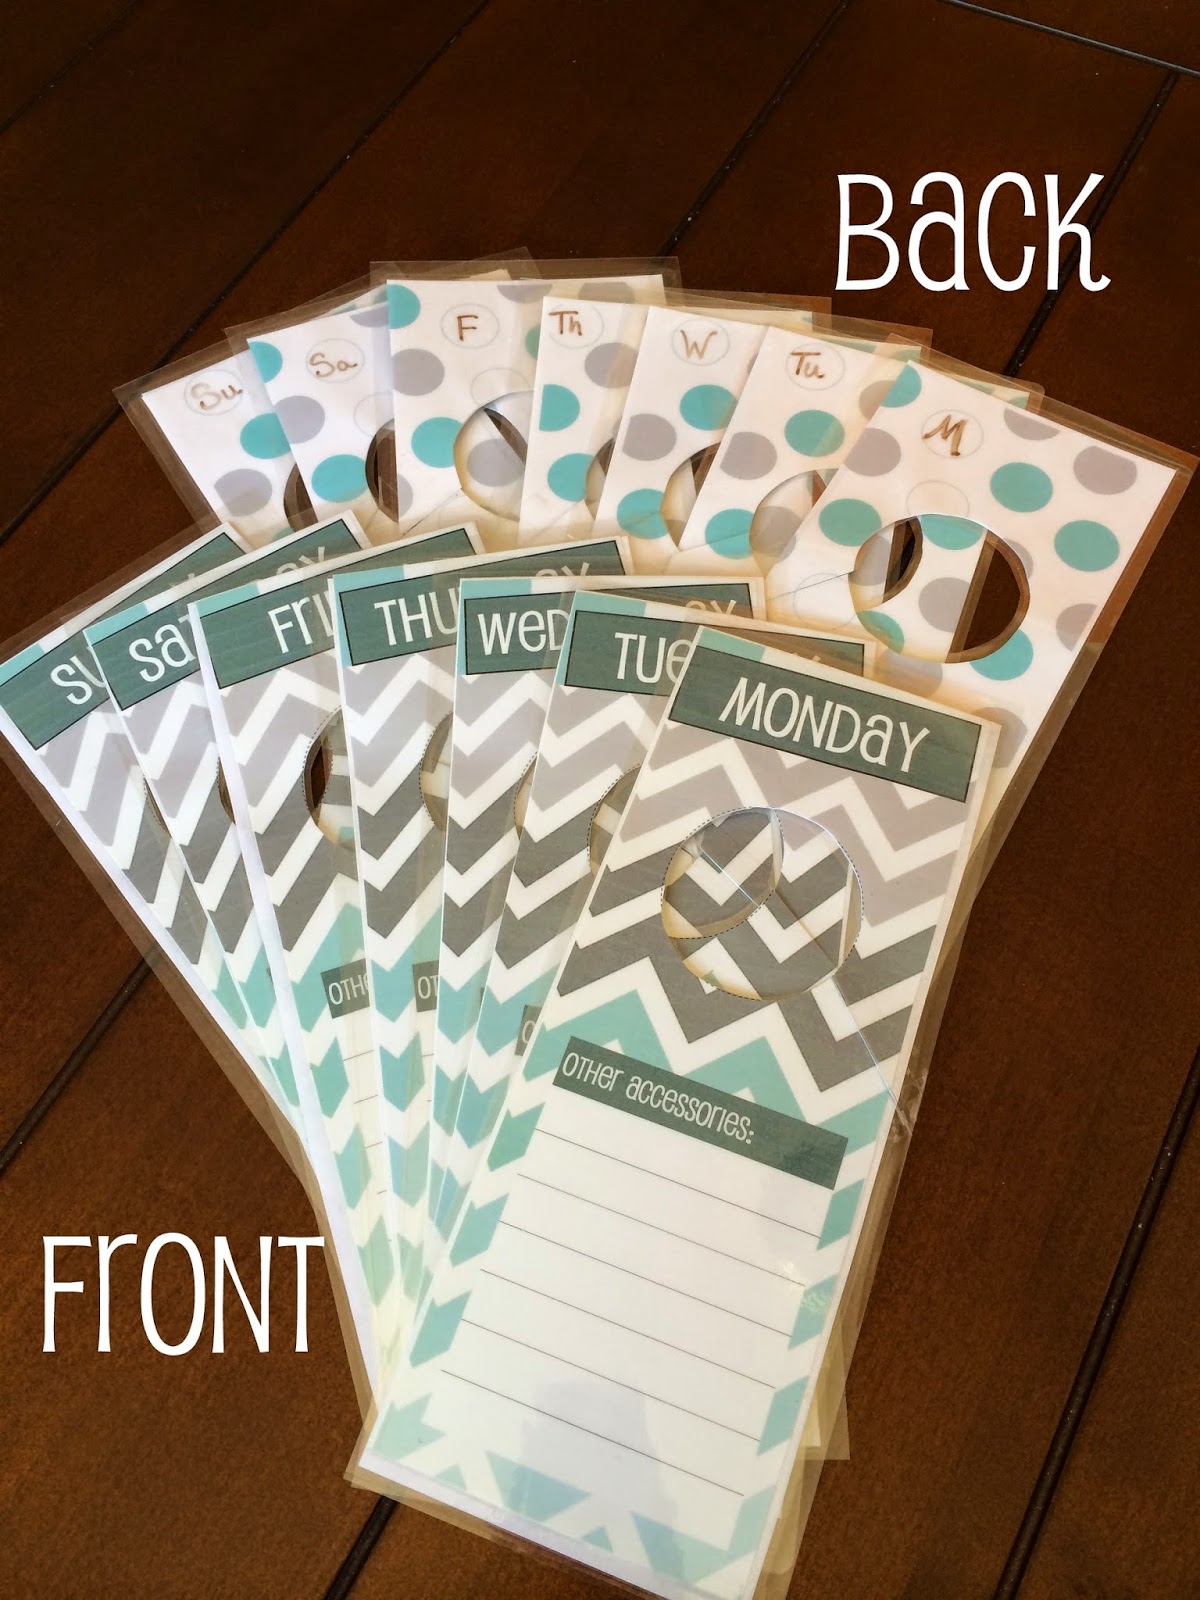
(On the polka dot size, I used a Sharpie to mark the corresponding day)


(I made another set for myself...LOL)
 So, I created this printable and I hope I did it right...see if you can download it here (front) and here (back)! (Please note, this makes 2 dividers per page so you can use them for multiple children or one for your child and one for you! Just cut out on the dotted lines and laminate!)

And finally 4. DIYFish Planner Inserts


I just couldn't pass up an opportunity to blog about my planner (LOL!). I have worked out a system that I'm really excited about (click to enlarge)!


As you can see, I'm using a day on two pages (here), and I've divided it up into columns so that I can keep track of everyone's schedule. I have three kids in three different schools plus I work outside the home and volunteer at my church and at the schools. Now I can keep track of it all in one place! Check out DIYFish's website for all her latest designs because I bet you'll find something that will work for you, too! And you know how much I value a paper planner...if you haven't tried one yet, see if it helps you keep this school year more organized! Check out my YouTube channel or more posts on this blog to get started!


Monday, June 30, 2014

Planner Obsession

Okay, I'm going to be honest with you guys...I LOVE my planner! I love my new DIYFish inserts! I love my new erasable Frixion pens...I think I have a problem. LOL

In fact, I spent some time over the weekend making a new planner for my office. I have been using a monthly 8 1/2 x 11 spiral bound calendar for the last few years, and then I add post-its for things like meeting notes, etc. But honestly, it just ends up a scribbled mess. So, I decided to try out DIYFish for work. I admit, I didn't get an ARC binder because I'm not ready to commit yet (and I don't want to carry my heavy punch back and forth from home to work...LOL) But, I found a half-size binder that will work for now. If this is something I think will work out well (and I suspect it will), I'll probably get an ARC for obvious reasons (reasons being: I love ARC. The End.).

Since I'm still fairly new to using DIYFish, I have been watching a lot of YouTube videos on how others use planners to get some inspiration and ideas. I've just found even more awesome organization systems that I can't wait to implement, like Bullet Journaling. Where has this been all my life?? It's like something I've naturally gravitated towards doing already, but much more polished and logically laid out. I have a feeling this is going to be a great system for me.

I wish I could be super creative and decorate my pages or use my graph paper for sketching or whatever. But the honest truth is I'm just not like that. It's not my personality! But I'm so grateful for everyone else's creativity because it makes this world a more beautiful place. In the meantime, I will stick with the basics.

And, just so this isn't a random post about a somewhat strange obsession (although I'm not alone in this--did you know there is a whole internet subculture out there all about planners?), I wanted to share with you a find: I ordered this personalized freezer inventory printable from IHeartOrganizing and I love it! For just $3 I have an unlimited supply of these (I can print them as much as I need). I punched it and keep it in the Menu section of my planner. Since we've moved, our garage freezer has just been a glorified ice bucket, so I am looking forward to refilling it and doing it organized!


Tuesday, June 24, 2014

DVD Storage

I finally jumped in and organized our DVD collection! I saw this idea on Pinterest months ago, and I couldn't wait to try it out. During the move, I pulled DVDs from every room, every drawer, every laptop bag I could find and collected them all into well labeled bankers boxes. I had a plan and knew I'd get to them eventually, so they went straight into the garage at the new house so I could sort through them once all the essentials were unpacked.

As we were moving, I went to Target a lot. A LOT. And each time, I would look for something that would work to store them in when we got settled in. That's when I found these boxes (at the bottom of the entertainment center).


They are no longer there, unfortunately--unless you are lucky enough to find them on clearance. But anything about this size would work! They are called "media boxes". Even a shoe box would work, though! Get creative!

Then, I went on the hunt for the DVD sleeves that were mentioned in the Pin I found...with no luck. So I bought some of these at Target (but you can get them anywhere, really). They are paper with a clear plastic window.


We already kept our DVDs in binders (well, most of them), so dropping the cases wasn't a huge deal to me. If that's a problem for you, or you're afraid to commit, you can always store the empty cases somewhere else if you have the room? I do recommend saving anything that you plan to resell someday...for obvious reasons. Also, there are quite a few apps out there that you can use to catalog your collection--and they use your phone's camera to scan the barcode and find the DVD for you in the library. That is a lot easier than typing each title by hand, so you may want to look into that before you ditch the cases as well...I speak from experience here. LOL

Anyway, even after I collected all of my supplies, I kept putting it off and putting it off (story of my life). But as family members decided they'd like to watch something and couldn't find it, I figured it's now or never...right?!


I pulled out some old scrapbook supplies and decided to use these strips as my dividers. I used my label maker to add a letter at the top, and I also made one with # for movies that start with a number (13 Going on 30 anyone??), and I made a label with a bicycle icon for exercise DVDs. 


I took the DVDs out of the binders and cases and sorted them into piles according to the letter they start with. Then I just went through each pile and put one DVD at a time in their new paper sleeves. Once that was finished (that's what took the longest, honestly), I then put them in alphabetical order...well, somewhat. I decided not to be too anal about it. All the As are behind the A tab, but they may be out of order within that category. Does that make sense? I figured for my own sanity, this was best because most likely someone isn't going to return them to the exact spot, so I'm not going to worry about it. As long as Wolverine gets returned behind the W divider, does it really matter if it's in front of What About Bob? Not to me...LOL


The only spot I felt needed a little subcategory attention was the S section...we have a LOT of Star Wars & Star Trek movies so I felt they needed their own sections.


I plan to go back through them all in the near future and put a special marking on children's movies and Christmas movies...so that way when we're thumbing through we can pick them out easily. Maybe I'll make a catalog of titles as well...if I do, I'll let you know!

A video is soon to come, so check back later!